
How to Make Multi-Layer Candles with Colored Pencils
How to MakeCandleLayered and multi-layer step-by-step process
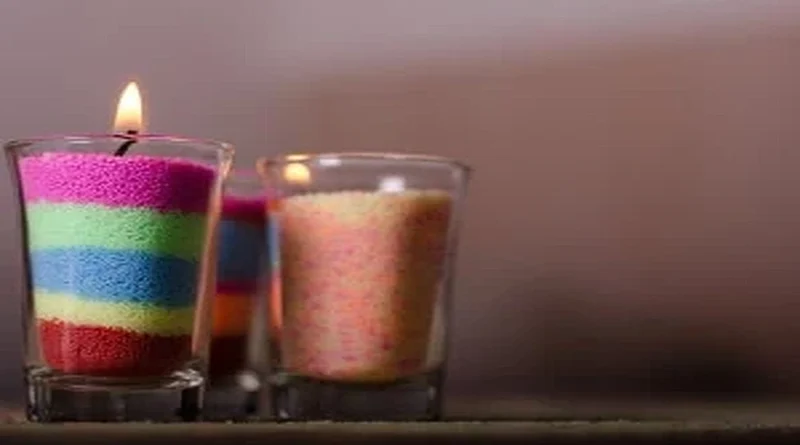
Layered or multi-layer candles look very beautiful because the different colored waxes are poured in layers, hardening into a layered appearance. These are called layered candles. You can reuse leftover colored wax from previous candle making projects to create these candles.
In this method, each layer can be chosen with a specific color or a combination of colors. The last layer should be the darkest shade of your chosen colors, and the final top of the candle should have the lightest color to create an attractive layered look.
You can use colored pencil pieces that are no longer usable or leftover wax chunks from previous candles. By using simple techniques, you can make layered candles at home easily.
For making layered candles, metal molds are the best option because they allow the wax to be easily removed after cooling. However, this technique requires more practice and skill compared to other types of candles. It’s a good way to reuse leftover colored pencils that haven’t been used for a long time. Each layered candle typically takes between 45 minutes to an hour to make.

Materials Needed and Steps for Making Multi-Layer Candles
Next, in this section of the Fashion World,SelmaDermaand candle-making tutorial, we will create a beautiful layered candle together.
Tools Needed for Making Multi-Layer Candles
- Colored Pencils
- Grated Paraffin Wax
- White or Colorless Scented Paraffin Wax (Optional)
- Clear Glass or Plastic Candle Mold
- Cloth Gloves
- Scissors
- Spoon
- Knife
- Candle Wick — choose the wick length based on the size of the chosen mold.
- Microwave-safe Cup

Steps for Making Layered and Multi-Layer Candles
Follow these steps to make a candle with colored pencils:
Step One
Carefully scoop a small amount of grated paraffin wax with a spoon and gently pour it into a suitable cup.
Step Two
Place the cup in the microwave and heat for 30 to 60 seconds at high temperature (about 60°C). During this process, the paraffin will melt and be ready to pour. When removing the cup from the microwave, wear cloth gloves to protect your hands from heat.
Step Three
To insert the candle wick: After melting the paraffin, pour it precisely into the chosen candle mold, then secure the wick firmly in the melted wax so that the bottom of the wick is fully submerged. Wait about 30 seconds for the wax to solidify and hold the wick in place.
Step Four
Select the colors you want for your layered candle. Choose colors that harmonize well and are close in shade. Your choice can be bright and lively or soft and natural. The key is to ensure the colors are coordinated so that the final layered candle looks beautiful and harmonious.

Step Five
Unwrap the paper from the colored pencils and arrange them in the order you want for your layered candle. Be careful and arrange the pencils neatly and systematically. This step is important to create ordered layers and a beautiful final result. Prepare for the next steps.
Step Six
Choose the colored pencil for the first layer and cut it into five small pieces. Do this carefully to prevent the pieces from sticking together. Cutting into small pieces allows for precise creation of the first layer and even coloring. Do not mix up the pieces and keep them ready for the next step.
Step Seven
Take half of the first set of pencil pieces and put them into the cup, then fill three-quarters of the cup with melted paraffin. If your mold is larger, adjust the amount of wax accordingly.
To improve the burning of the layered candle, consider using fewer colored pencils and less pencil pieces in the wax. For a scented candle, you can add half a small scented wax cube to the mixture. All layers should contain scented wax for a nice fragrance.

Step Eight
Place the cup with the wax and pencil mixture in the microwave and heat for three minutes, removing and stirring the mixture every 30 seconds. If the wax melts completely before three minutes, you can stop earlier.
Step Nine
Pour the melted mixture gently into the candle mold when fully liquid, taking care to avoid the wick. You do not need to fill the mold completely; consider the height and number of colors to determine the thickness of each layer.
Use a marker to mark the thickness of each layer on the mold, and erase these marks after the candle is finished. If the mixture sticks to the sides, wait for it to dry and then scrape it off.
Step Ten
Set aside any leftover mixture or pour it into other molds. Then clean the inside of the cup thoroughly with a paper towel. Do not wash the cup with water during the process, as it might affect the melting of the wax.
Step Eleven
Wait for the paraffin in the mold to cool and harden completely. Normally, it takes about 15 to 20 minutes at room temperature. If you want to speed up the process, you can place the mold in the refrigerator, which reduces drying time to about 5–7 minutes. Do not proceed to the next step before the first layer is fully solidified.

Step Twelve
Repeat steps six to eleven for additional layers. When finished, the top layer should be 1–2 cm below the edge of the mold.
Step Thirteen
After adding the final layer and ensuring it is fully solidified, trim the wick to about one centimeter below the surface of the candle. Your layered candle is now ready.
You can also create layered candles with diagonal or oblique layers by holding the mold at an angle while pouring or cooling the wax.